Size Panoramic Canvas Prints to 60–75% of Furniture Width
For most living rooms and hallways, the go-to panoramic canvas sizes are 12×36, 16×48, and 20×60, with 8×20 covering tighter spots like entryways. The one rule that decides which of those fits: pick a canvas roughly between about 60 and 75 percent of the width of the furniture or wall segment it hangs above. Everything else in sizing comes down to applying that ratio correctly, which the sections below walk through.
TL;DR:
- Use a canvas width between 60 and 75 percent of the furniture or wall segment it will hang above to achieve a balanced visual proportion.
- Standard panoramic sizes like 12x36 or 16x48 suit most room placements, with larger sizes such as 20x60 serving as room focal points.
- Measure furniture width and aim for a target size within the 60 to 75 percent range, ensuring at least 6 to 8 inches of clearance on sides.
- Opt for a 3:1 aspect ratio like 12x36 or 16x48 for landscape scenes and cityscapes, avoiding overly wide ratios that crop important image elements.
- Prioritize image resolution, aiming for 150 to 300 DPI based on viewing distance, and confirm that source files support your chosen size to prevent softness.
Table of Contents
- Popular Panoramic Canvas Sizes and Where They Work
- How to Measure Your Wall and Choose the Right Width
- Panoramic Aspect Ratios and How They Affect Composition
- DPI, Pixel Dimensions, and File Formats for Large Panoramas
- What to Expect When Ordering a Custom Panoramic Size
- Why Sense Canvas Backs These Sizing Recommendations
- Subjects and Themes That Suit Different Panoramic Widths
- Panoramic vs. Standard Canvas Sizes: Cost and Practicality
- What Most Sizing Advice Gets Wrong
- Ordering Your Panoramic Canvas Through Sense Canvas
- Sources
Popular Panoramic Canvas Sizes and Where They Work
Panoramic canvas sizes fall into three rough tiers, and knowing which tier matches your wall saves you from guessing twice. Standard options like 8×24, 10×30, 12×36, 16×48, and 20×60 cover almost every room in a typical home or office, and most print providers stock these as ready-made dimensions.
Small and entry-level (8×20, 8×24, 10×30): These sizes suit narrow hallways, above a desk, or a small accent wall where you want wide art without heavy visual weight. An 8×24 canvas over a console table reads as intentional rather than cramped.
Mid-range (12×24, 12×36, 16×48): This is the workhorse category. A 12×36 canvas is a popular panoramic dimension because it maps cleanly to a 3:1 ratio and works above a queen bed, a media console, or a mantel. A 16×48 steps up the drama for a longer wall, like behind a dining table or a wide office reception desk.
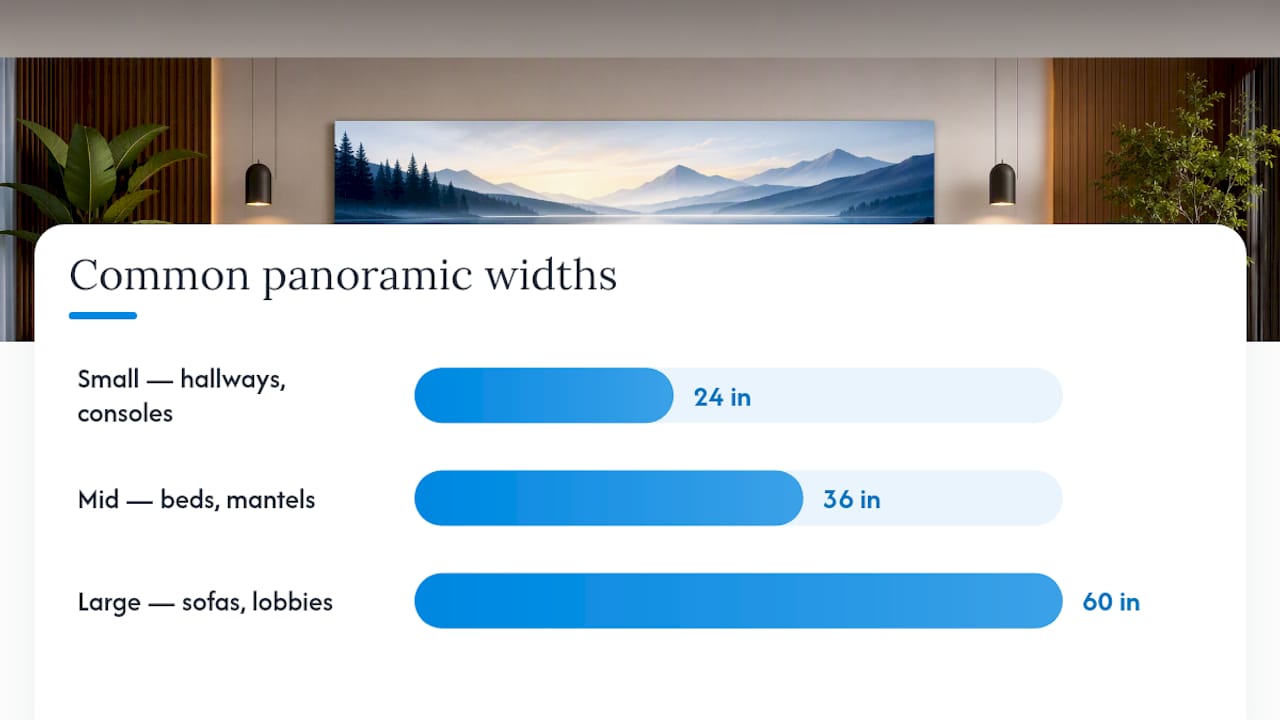
Large and statement pieces (20×60, 24×72): These sizes anchor a room. A 20×60 canvas above a sectional sofa or a home theater wall becomes the focal point rather than a supporting piece, and 24×72 pieces show up most often in offices, lobbies, or above a king bed with generous wall clearance.
Here’s how the sizes map to common placements, based on general sizing guidelines:
- Above a sofa: sizes around 16×48 or 20×60, depending on sofa length
- Above a bed: sizes near 12×36 for a queen-sized bed, larger for king-sized beds
- Hallways and entryways: smaller panoramic sizes, such as around 8×20 or 8×24
- Mantels: medium panoramic sizes like 10×30 or 12×36, scaled to mantel width
- Office reception or conference walls: larger panoramic sizes, suitable for wide spaces like 20×60 or 24×72
Aspect ratio matters as much as raw inches here. A 2:1 ratio (like 10×20) reads as moderately wide, while a 3:1 ratio (12×36) stretches further and suits sweeping landscape shots or long architectural walls. Both ratios show up constantly in panoramic catalogs because they match how cameras naturally crop wide scenes, which means you rarely need custom cropping to make a photo work at these dimensions.
How to Measure Your Wall and Choose the Right Width
Getting the size right starts with two numbers: the width of the furniture below the space, and the total visible wall width around it. Skip either measurement and you risk a canvas that looks stranded or overwhelms the room.
Step 1: Measure the furniture. Pull a tape measure across the widest visible point of the sofa, bed frame, or console.
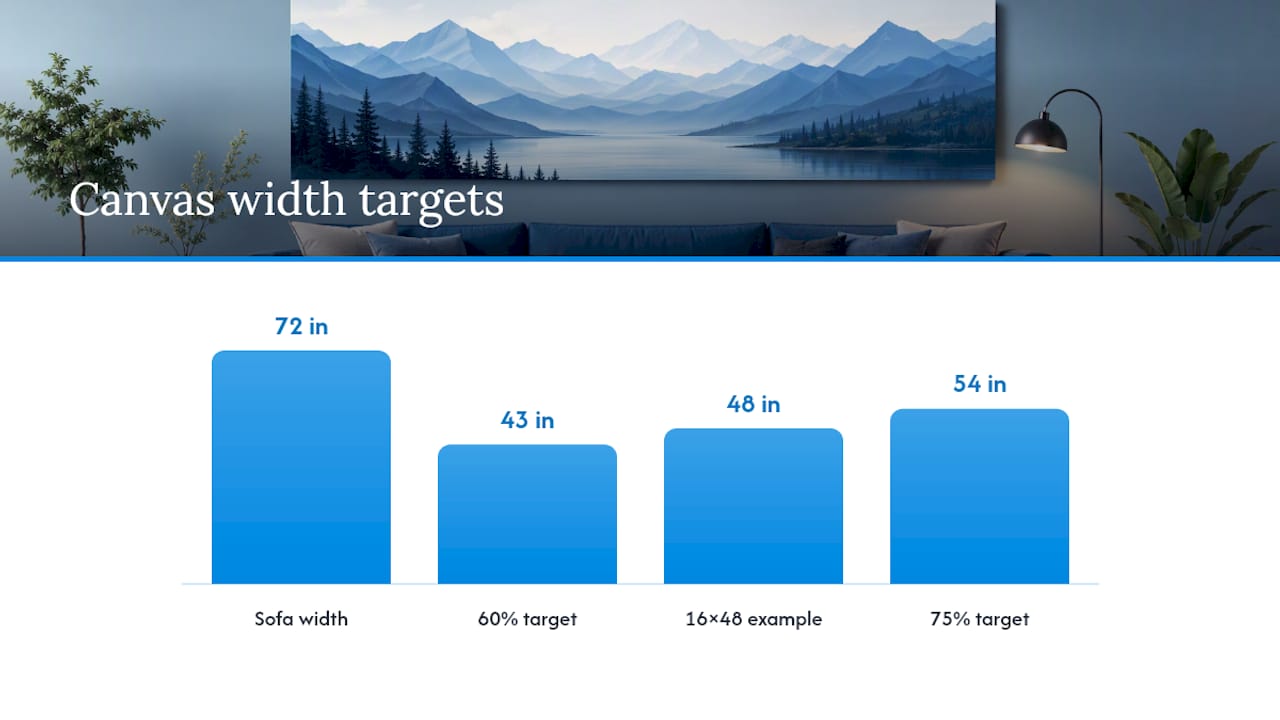
Step 2: Apply the percentage rule. Multiply that width by approximately 0.60 and 0.75 to get your target range. For example, a sofa about six feet wide suggests a canvas width starting around half the sofa’s width to about three-quarters of it. The nearest standard panoramic size in that window is a 16×48 canvas, which lands right in the middle of the range.
Step 3: Check clearance. Leave at least 6 to 8 inches of breathing room between the canvas edge and any lamps, wall corners, or adjacent furniture.
Step 4: Set the hanging height. Center the canvas so its middle point sits 57 to 60 inches from the floor, which matches average eye level whether you’re in a hallway or living room. Above furniture, that usually means keeping 6 to 10 inches of gap between the top of the piece and the bottom of the canvas.
Before you order, run through this short checklist:
- Have you measured the furniture width, not just the wall width?
- Does your target size fall within the 60 to 75% range?
- Is there enough clearance on both sides for the frame?
- Will the hanging height put the center near 57 to 60 inches?
- Would two smaller panels work better than one long canvas for this wall?
For step-by-step hanging mechanics once you’ve settled on a size, the guide to sizing and hanging art above a sofa walks through anchor placement and stud spacing in more detail.
Pro Tip: If your furniture width lands right between two standard sizes, round down rather than up. A panoramic canvas that’s slightly narrower than the sofa looks curated. One that’s wider tends to look like it was hung before the furniture arrived.
Panoramic Aspect Ratios and How They Affect Composition
Aspect ratio determines how “panoramic” a piece actually feels, and getting it wrong is the fastest way to lose part of your image. The three ratios that dominate wide-format printing are:
- 2:1 — moderate width, examples include 10×20 and 20×40, good for photos with a clear horizontal subject but not much empty sky or foreground
- 3:1 — the most popular panoramic ratio, seen in 12×36 and 16×48, ideal for landscape photography and sweeping cityscapes
- 4:1 — an aggressive stretch, seen in 8×32, best reserved for images shot specifically as panoramas rather than cropped from a standard photo
The mistake most people make is choosing a wider ratio because it looks dramatic in a thumbnail, then discovering the focal subject sits too close to the trimmed edge once it’s printed at 60 inches wide. Before locking in a 4:1 ratio, check whether your image has enough width to support the crop without pushing your main subject into the gallery wrap.
DPI, Pixel Dimensions, and File Formats for Large Panoramas
Print quality on a panoramic canvas depends more on viewing distance than most people expect. A canvas hung six feet away in a living room doesn’t need the same pixel density as one mounted where people stand close to it.
For pieces viewed from a normal room distance, 150 DPI is generally sufficient, while art meant for close inspection, like a hallway piece people pass within arm’s reach, benefits from 240 to 300 DPI.
Pixel dimension targets by size:
- 16×48 at 150 DPI: roughly 2400×7200 pixels
- 16×48 at 300 DPI: roughly 4800×14400 pixels
- 12×36 at 150 DPI: roughly 1800×5400 pixels
- 20×60 at 150 DPI: roughly 3000×9000 pixels
If your source photo doesn’t hit those numbers, upscaling software can help, but only to a point. A photo shot on an older phone camera will show softness at 300 DPI no matter what tool processes it, so 150 DPI is often the more honest target for large statement pieces.
Stick to TIFF files when you have them, since they hold detail without compression artifacts; a high-quality JPEG works fine as a second choice.
What to Expect When Ordering a Custom Panoramic Size
Custom sizing changes the math slightly because gallery wrap consumes part of your image. Expect 0.75 to 1.5 inches of bleed per side to wrap around the frame edge, which means the visible front-facing image is smaller than the canvas’s stated dimensions.
- Mirrored edge: repeats the image content along the wrap, safest for busy or textured images
- Color wrap: extends a solid background color, cleanest for minimalist or single-subject art
- Continued image: stretches the actual photo content around the edge, best when the source file has enough resolution to spare
Choose a custom numeric size over the nearest standard option only when your wall measurement doesn’t fall within a few inches of a stock size. Custom orders typically add production time compared to standard sizes, so confirm lead times before committing to a tight deadline.
Why Sense Canvas Backs These Sizing Recommendations
Sense Canvas maintains a catalog of over 15,000 artworks, which means most of the sizing guidance above isn’t theoretical. Customers routinely request custom sizing to fit walls that don’t match stock dimensions, and every custom order comes with a mockup before production starts, so you see the crop before it’s printed rather than after.
That mockup step matters more for panoramic sizes than standard ones, since a wide aspect ratio is the fastest way to accidentally crop a subject out of frame. Reviewing a scaled preview against your actual wall measurement catches that problem early. The custom canvas sizing guide covers what information to send when requesting a size outside the standard list.
Subjects and Themes That Suit Different Panoramic Widths
Not every image translates well to a wide format, and the subjects that do tend to cluster by ratio. Landscape photography, ocean horizons, and mountain ranges are the classic fit for panoramic canvas prints because the composition already has a natural horizontal spread. A 3:1 ratio like 12×36 handles these scenes without forcing an awkward crop.
City skylines and architectural rows work well at 2:1 or 3:1, since buildings naturally line up along a horizontal axis. Abstract art and color-field pieces are more forgiving of aggressive ratios like 4:1, because there’s no single focal point that risks getting cut off at the edges.
Motivational quotes and typography-based art tend to work best on shorter panoramic ratios, closer to 2:1, since long strings of text need enough vertical room to stay legible without shrinking the font. Family portraits and group photos rarely suit panoramic formats at all unless the group is genuinely spread wide, since a tall aspect ratio usually flatters faces more than a stretched one does.
If you’re choosing art for a themed room, browsing landscape canvas print options before settling on a size helps match the subject to the ratio rather than forcing a favorite photo into a shape it wasn’t composed for.
Panoramic vs. Standard Canvas Sizes: Cost and Practicality
Panoramic canvases cost more than standard square or rectangular prints at a comparable total square footage, mostly because wide-format printing requires specialized equipment and more careful stretching during production. A 16×48 panoramic uses roughly the same canvas material as a 24×32 standard piece, but the wrap process for a long, narrow format takes more precision to avoid warping.
Usability is where the real trade-off shows up. A standard rectangular canvas, something like 24×36, fits almost any wall without much planning, while a panoramic size demands a wall segment with the right proportions. Try to hang a 20×60 canvas in a spot better suited to a square piece and it either overwhelms a small wall or leaves the immediate area looking unbalanced.
The upside is that panoramic sizes fill horizontal space that standard sizes simply can’t cover as gracefully, making them key elements of room-specific decor ideas. Above a long sofa or a wide headboard, a single panoramic canvas often looks more deliberate than two or three smaller standard pieces grouped together, and it’s typically less hassle to hang one canvas than to level a gallery wall arrangement. For rooms with wide, unbroken wall stretches, panoramic sizing solves a problem standard dimensions were never built to address.
What Most Sizing Advice Gets Wrong
People measure the wall instead of the furniture below it, which produces a canvas that technically fits the room but looks disconnected from the couch or bed it’s meant to anchor.
The other overlooked factor is resolution planning before size selection, not after. Readers pick a dramatic 20×60 canvas first and only check pixel dimensions once the file looks soft at full size. Flip that order: know your image’s real resolution ceiling, then choose the largest panoramic size that resolution supports.
Prioritize the furniture measurement and the resolution check before anything else. Aspect ratio and framing choices matter, but they’re secondary decisions that only work well once the size itself is grounded in the room’s actual proportions. A well-chosen 12×36 canvas printed from a sharp file will always outperform an oversized, softly detailed 24×72 hung on a wall that couldn’t really support it anyway.
— Sense
Ordering Your Panoramic Canvas Through Sense Canvas
Once you know your target size and ratio, ordering is a short process rather than a guessing game. On Sense Canvas, you browse the catalog for a design that fits your ratio, select a custom size if your wall doesn’t match a standard dimension, request a mockup, and approve the crop before it goes to print. That mockup step is the part most print shops skip, and it’s the difference between a canvas that lands exactly where you measured it and one that surprises you at the edges.
Prices start at accessible levels, keeping a properly sized panoramic canvas within reach even for a statement piece like a 20×60. If you’re drawn to bold, wide-format subjects, the abstract ocean panoramic print shows how a horizon-based image fills a long wall without cropping issues. Measure your wall, pick your size, and request your mockup before committing to production.